Here's a snotty bit of goodness. I've been working with some people at work on a short video (targeted at school kids) to promote "germ awareness." Washing hands, and the like. So, there's a slo mo sneeze in there, and I created the particles and fluids and snot and spit coming out of our talent's mouth. (All artfully exaggerated, for the kids' enjoyment).
Created in 3ds max using particle flow and blobmesh objects. Rendered passes: diffuse, ambient occlusion, beauty, specular- for each of three parts of the sneeze: the small particle spray, the main globs coming out of the mouth, and the beautiful dripping from her nose. Comped in After Effects, augmented with a few AE particles along the way. In retrospect, I wish this was an HD project, it looks much more impressive in higher rez. Anywho, enjoy.
Tuesday, October 23, 2007


Monday, October 15, 2007
Blackberry Spot
So here's what I've been working on lately: a Blackberry spot for T-Mobile with Chicago post house Outsider, Inc. We were given a Maya model of the phone, but as the project progressed it became clear that it needed some modeling changes, shading upgrades... Overall maintainance issues abounded. So in all, my contributions here were the following:
-some modeling, shading
-animation
-background creation
-lighting
-rendering
The shots were cut together at Outsider. Although a stressful experience, I learned a lot and wish the best for the awesome crew I worked with. Chears!


-some modeling, shading
-animation
-background creation
-lighting
-rendering
The shots were cut together at Outsider. Although a stressful experience, I learned a lot and wish the best for the awesome crew I worked with. Chears!


Tuesday, September 04, 2007
Siggraph
Okay! So I haven't been jottin' in a while but I've been tremendously busy lately (in a good way).

In Early August, I went out to sunny San Diego for the annual Siggraph convention (I was armed with free tickets by the good folks at www.renderosity.com. It seems the hot issues now are 3D displays and motion capture without the need for a mocap stage.


The truth, however, is that I was more concerned with what would happen if I was offered a job out here. I was safe in the assumption that I was shopping around a vastly superior demo reel than last year in Boston, so it was not out of the realm of possibility. This scared me, however... what would I do? Would I move out here and follow work?
The other side of the issue made me equally uneasy. If I got no response whatsoever, would that mean I was no good, that I had made no progress where it really mattered? I did get a response, -one of them- from an automotive visualization company, but that has since fallen through.)
Since then, I have completed a freelance job here in Chicago, so things look pretty good. The question still haunts me, though... Am I working hard enough? Everyone around me says I work too much... but I need to decide for myself.
The good news is that San Diego is absolutely gorgeous. I had the chance to see it on a trolley... a trolley I avoided paying for by hopping in a cab after I was asked to buy a ticket and escaping to the airport, to be in the air an hour later--a perfect getaway.

The beach was amazing, just what I needed. The ocean felt great, the 78 degree weather was perfect, and the change of scenery was just what I needed.

Well, I'll just leave it at that. I have more updates coming up, so I don't want this to take up too much of my blog space.

In Early August, I went out to sunny San Diego for the annual Siggraph convention (I was armed with free tickets by the good folks at www.renderosity.com. It seems the hot issues now are 3D displays and motion capture without the need for a mocap stage.


The truth, however, is that I was more concerned with what would happen if I was offered a job out here. I was safe in the assumption that I was shopping around a vastly superior demo reel than last year in Boston, so it was not out of the realm of possibility. This scared me, however... what would I do? Would I move out here and follow work?
The other side of the issue made me equally uneasy. If I got no response whatsoever, would that mean I was no good, that I had made no progress where it really mattered? I did get a response, -one of them- from an automotive visualization company, but that has since fallen through.)
Since then, I have completed a freelance job here in Chicago, so things look pretty good. The question still haunts me, though... Am I working hard enough? Everyone around me says I work too much... but I need to decide for myself.
The good news is that San Diego is absolutely gorgeous. I had the chance to see it on a trolley... a trolley I avoided paying for by hopping in a cab after I was asked to buy a ticket and escaping to the airport, to be in the air an hour later--a perfect getaway.

The beach was amazing, just what I needed. The ocean felt great, the 78 degree weather was perfect, and the change of scenery was just what I needed.

Well, I'll just leave it at that. I have more updates coming up, so I don't want this to take up too much of my blog space.
Wednesday, July 25, 2007
"No One" final shots
Okay kiddees! Few words, lotsa video this time around. I'm showin' off my finished shots from the No One practicum film.
For this shot I had to track flies to the boys face. This shot is still actually in final stages of tweaking, as the tracking isn't quite 100% yet.
That's the animatic version of the next shot. The animation was created using 3ds max's Crowd system.
The first shot I finished. A breakdown of this effect, including the compositing layers I used, will soon be featured in my demo reel.
I wish the resolution was greater, then you could see that I actually animated the legs of the flies moving. While not too impressive technically, (just some 2D tracking and a few flies), I like this shot because it shows that I could pull off having the flies sitting still and walking around in a convincing way.
This shot, and the next one, were achieved using Photoshop and Combustion. We shot the talent with faces in a slew of different positions, which were then cut up, warped, blurred, and composited.
I want to thank all the talented people who worked on this film with me! See you all at the premiere!
For this shot I had to track flies to the boys face. This shot is still actually in final stages of tweaking, as the tracking isn't quite 100% yet.
That's the animatic version of the next shot. The animation was created using 3ds max's Crowd system.
The first shot I finished. A breakdown of this effect, including the compositing layers I used, will soon be featured in my demo reel.
I wish the resolution was greater, then you could see that I actually animated the legs of the flies moving. While not too impressive technically, (just some 2D tracking and a few flies), I like this shot because it shows that I could pull off having the flies sitting still and walking around in a convincing way.
This shot, and the next one, were achieved using Photoshop and Combustion. We shot the talent with faces in a slew of different positions, which were then cut up, warped, blurred, and composited.
I want to thank all the talented people who worked on this film with me! See you all at the premiere!
Tuesday, June 26, 2007
A lotta Croc
First phase of upgrading my croc image is complete. I have created a displacement map in Mudbox, and also upgraded my croc anatomically. I feel he has real weight now. I switched to rendering with mental ray and am very pleased with the results. I've included the displacement map (down-rezed and brightened) and a few renders for your viewing pleasure.
Next up: I want to comp it into a real environment. Possibly my new apartment. Marble DavidCroc statues are tres chic these days.


Next up: I want to comp it into a real environment. Possibly my new apartment. Marble DavidCroc statues are tres chic these days.


Monday, June 25, 2007
Warzone Continues
After some time contemplating how to tackle this shot, I have decided on the following approach: mix 2D compositing tricks, including practical smoke, fire, and debris elements, with CG rendered stuff.
I would have gone mainly 3D but the shot includes a zoom (which I consciously filmed to make it more challenging... hiring managers! pay attention....), not to mention the across-the-sky pan. Because the detail at the end of the zoom would have to be in good focus and not pixelated, the resolution for the whole comp (when zoomed out) would have been 4,000 x 3,200 pixels... a bit too much for me. So I will create the hole in the building with photoshop and camera project it onto the building, and layer on falling debris, paper, smoke, and a human figure.
The following video is the tracked footage, courtesy of boujou 4. The colorful markers and the wire box around the main building is computer generated, you can tell the track was successful because for my purposes, it looks like the CG block is securely situated in the scene without any "wiggling" that would betray a bad camera track. Sweet!
Tomorrow: new renders of the croc. Damn, he looks SMOKIN'.
I would have gone mainly 3D but the shot includes a zoom (which I consciously filmed to make it more challenging... hiring managers! pay attention....), not to mention the across-the-sky pan. Because the detail at the end of the zoom would have to be in good focus and not pixelated, the resolution for the whole comp (when zoomed out) would have been 4,000 x 3,200 pixels... a bit too much for me. So I will create the hole in the building with photoshop and camera project it onto the building, and layer on falling debris, paper, smoke, and a human figure.
The following video is the tracked footage, courtesy of boujou 4. The colorful markers and the wire box around the main building is computer generated, you can tell the track was successful because for my purposes, it looks like the CG block is securely situated in the scene without any "wiggling" that would betray a bad camera track. Sweet!
Tomorrow: new renders of the croc. Damn, he looks SMOKIN'.
Wednesday, June 20, 2007
Croc on a Spaceship!
Ok, so in keeping with my promise to keep you guys up to date with more varied projects I'm working on, here are some previz renders of a ship I'm developing for a short film shot by Columbia film students. The story has a Christian religious theme so I'm working on creating a ship that channels some architectural elements from cathedrals and other religious structures- such as buttresses, spires, arches, etc. Even the cross shape was inspired by a classical layout of a cathedral. The quicktime is a test of the engine propulsion system and power generator. We tried to stay away from a classic, massive thruster engine, we even experimented with a solar sail concept (didn't work out). We wanted something more elegant.
The first image was the first previz render I made with annotations, which I emailed to the director. The next renders are successive iterations of the design.
And what about the Gator? Well, I'm going to revamp my Crocodile David model with displacement from Mudbox as well as a video background with HDR lighting. I wanted to make it look more impressive; I noticed that the projects I'm developing now will really outshine it and I wanted to make sure to keep it up to date. Because I like it.


The first image was the first previz render I made with annotations, which I emailed to the director. The next renders are successive iterations of the design.
And what about the Gator? Well, I'm going to revamp my Crocodile David model with displacement from Mudbox as well as a video background with HDR lighting. I wanted to make it look more impressive; I noticed that the projects I'm developing now will really outshine it and I wanted to make sure to keep it up to date. Because I like it.


Tuesday, June 19, 2007
More Beer
So I finished the Beer tutorial from the www.mentalboutmax.co.uk. The video tutorial must have lasted up to about four hours and let me tell ya, with their lolling British accents these guys are anything but (excuse me, boot) a bore.
Anyway, below is my finished image. There are a few things I could potentially fix about it, and the background is anything but stunning, but, as I said, this isn't really going on my reel. It's a stepping stone to create my own project.

Anyway, below is my finished image. There are a few things I could potentially fix about it, and the background is anything but stunning, but, as I said, this isn't really going on my reel. It's a stepping stone to create my own project.

Friday, June 15, 2007
Intoxication Inspiration
So scrolling through this blog I realized I don't really have a large gamma of work on display. I've got the No One head, some flies, and one or two other things scattered here and there. So I'm gonna break this pace up a bit by posting a little side project of mine.
I'm doing a beer tutorial simulating a possible commercial shot for a beer company. The tutorial is from the wonderful site www.mentalboutmax.co.uk and is mostly concerned with advanced rendering and lighting. Once I'm through with this, I'm going to create my own image. I'll go with a wine bottle however, with a fine cork, some glasses, and maybe a bunch of grapes artistically positioned in the background, all lit by an afternoon sun. It's going to be a... bella sera.
Anywho, here are the images that I've got so far in the tutorial.


Arrivederci, until next time!
I'm doing a beer tutorial simulating a possible commercial shot for a beer company. The tutorial is from the wonderful site www.mentalboutmax.co.uk and is mostly concerned with advanced rendering and lighting. Once I'm through with this, I'm going to create my own image. I'll go with a wine bottle however, with a fine cork, some glasses, and maybe a bunch of grapes artistically positioned in the background, all lit by an afternoon sun. It's going to be a... bella sera.
Anywho, here are the images that I've got so far in the tutorial.


Arrivederci, until next time!
Thursday, June 14, 2007
New Reel
Hey all, so I'm sending out my first batch of reels. Three of them so far. I'm still working on my hardcore reel, which I hope to be finished by about mid-July, early August. My new Reel is viewable on my digitalradek.blogspot.com website. If you're too lazy to paste that into your browser, if you'll just drag your eyeballs over to the right a bit... there ya go. There's a link for ya!
The updates include some older stuff cut out, and a turntable clip of the new fleshy-looking head and fly model inserted.
Here are some preview files from da new shit:


The updates include some older stuff cut out, and a turntable clip of the new fleshy-looking head and fly model inserted.
Here are some preview files from da new shit:


Monday, June 04, 2007
Dammit.
So here I am, all proud of my new fly model... and FEED posts this on their banner:
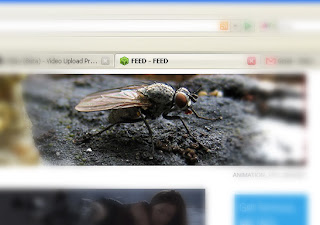
Fuck you, Stash. Rub it in.
My only comfort is that my fly was created to be a little bug flying around in a swarm and it still looks remarkably good up close. Take that.

Fuck you, Stash. Rub it in.
My only comfort is that my fly was created to be a little bug flying around in a swarm and it still looks remarkably good up close. Take that.
Other Pizzaz...
I just realized I haven't really been representing my full range of works in progress on this blog... so here go the rest of projects I'm hammering away on.
As stated earlier, I have, indeed, been working on the CG head that was eventually cut from the film No One. I have created blend shapes for facial expressions, done texture mapping for diffuse, specular, bump, and obviously displacement mapping. Plus a simple subdermal layer to make the skin appear less linearly colored and even a bit damaged underneath. Photoshop was used for all texturing except for the Displacement (Mudbox) but thinking back on it, perhaps BodyPaint would have worked equally well. Bummer.
Critiques are welcome. This image now rests on my PC desktop, as I normally do with new work-- this way, I can gradually notice things I can improve upon even while working on other things. I've noticed that the specularity may be too high... however, I've noticed in my research that scar tissue usually is more reflective and "shiny" than healthy skin. Also, the current render of the head is lit by a few spot lights; this will eventually be lit much differently and this will hopefully diffuse the specularity a bit.
Model as of June 4:

Color:

Spec:

Bump:

Displacement:

Subdermal:

A while ago, I also completed a heavy compositing tutorial from 3d World magazine about compositing a scene of destruction. The end result looked quite good and I put it on my reel and got much praise for it, but I always felt it was a cheat to use a tutorial on a demo reel, so I'm making my own version of this. It will feature more intense camera tracking, more intense destruction, more intense 3D vehicles, and, most importantly, more INTENSITY!
Here's what's going on in the shot (it is meant to be handheld and amateurish, as if a tourist was filming this scene just moments after it happened-- hopefully, this will heighten the emotional impact of the shot). The lens cap will come off and a moment after, three jets will cut through the sky above. Tilt down to show a smoking, burning building, with several choppers hovering around it. Zoom in to point of impact to show more destruction, a man falling... tilt down to ground level, where debris tumbles down and clouds of dust bloom up. The end.
Here's the background plate that I shot, ironically, on Memorial Day.
As stated earlier, I have, indeed, been working on the CG head that was eventually cut from the film No One. I have created blend shapes for facial expressions, done texture mapping for diffuse, specular, bump, and obviously displacement mapping. Plus a simple subdermal layer to make the skin appear less linearly colored and even a bit damaged underneath. Photoshop was used for all texturing except for the Displacement (Mudbox) but thinking back on it, perhaps BodyPaint would have worked equally well. Bummer.
Critiques are welcome. This image now rests on my PC desktop, as I normally do with new work-- this way, I can gradually notice things I can improve upon even while working on other things. I've noticed that the specularity may be too high... however, I've noticed in my research that scar tissue usually is more reflective and "shiny" than healthy skin. Also, the current render of the head is lit by a few spot lights; this will eventually be lit much differently and this will hopefully diffuse the specularity a bit.
Model as of June 4:

Color:

Spec:

Bump:

Displacement:

Subdermal:

A while ago, I also completed a heavy compositing tutorial from 3d World magazine about compositing a scene of destruction. The end result looked quite good and I put it on my reel and got much praise for it, but I always felt it was a cheat to use a tutorial on a demo reel, so I'm making my own version of this. It will feature more intense camera tracking, more intense destruction, more intense 3D vehicles, and, most importantly, more INTENSITY!
Here's what's going on in the shot (it is meant to be handheld and amateurish, as if a tourist was filming this scene just moments after it happened-- hopefully, this will heighten the emotional impact of the shot). The lens cap will come off and a moment after, three jets will cut through the sky above. Tilt down to show a smoking, burning building, with several choppers hovering around it. Zoom in to point of impact to show more destruction, a man falling... tilt down to ground level, where debris tumbles down and clouds of dust bloom up. The end.
Here's the background plate that I shot, ironically, on Memorial Day.
Friday, June 01, 2007
Fly, baby, fly!
Here we go. Graduated school. Parties, booze, and lack of sleep for about a week to celebrate, and then...
Finally get to work on things I decide I want to work on! What an amazing feeling, one I hadn't realized I didn't feel for a helluva long time. But enough rumination.
The fly modeling and texturing and shading for the practicum short "No One" is finished! Of course, creating an organic swarm of these buggers will be another challenge, but there's no doubt that the effect will be done (and done well). It's just a matter of continual finessing and massaging until it really sings.
The foolish observer may ask, "But Radek, why model so much detail in a fly that will not only be briefly visible in the film, but will most likely be either a) out of focus, or b) blurred beyond recognition due to the erratic flying?"
To that I answer: Yep. There's no GREAT reason for making the fly as detailed as I did; I could probably have gotten away with much less. Here are the reasons in defense of my tainted judgment:
1.) I love doing it! It's fun, and I I find that once it starts looking good I can't stop work on it. I just have to keep laying in the fine brush strokes. I can't turn it off even if I tried. Walking down the street from the gym I couldn't help but think about how I should add small hairline fractures and imperfections on the wings, how the head needs some nasty fly hair just like the thorax and abdomen, how the crystalline chitin of the wings seemed to scatter light in a pattern that created small blooms of orange and yellow coloration when the light hit it at just the right angle, and how I could create this effect with a custom shader... (all of which I immediately implemented upon returning home). I should note that these details are the result of a lot of due diligence and collecting of both internet and self-filmed (yes, I went out with my camera and filmed real flies... I'm not a loser, really, I totally have a girlfriend...) reference material... it is impossible to call into mind such subtle nuances. Besides, maybe subconsciously, these details DO register when a person watches a CG object onscreen, making it more realistic. Who knows.
2.) It'll look better on my modeling reel.
3.) I could probably stick it on TurboSquid and sell it to make a few bucks more than if it was a low resolution fly.
Okay, enough foreplay. Here're the shots. Email me or post comments if you need to vent. Profanity is welcome and encouraged.


Finally get to work on things I decide I want to work on! What an amazing feeling, one I hadn't realized I didn't feel for a helluva long time. But enough rumination.
The fly modeling and texturing and shading for the practicum short "No One" is finished! Of course, creating an organic swarm of these buggers will be another challenge, but there's no doubt that the effect will be done (and done well). It's just a matter of continual finessing and massaging until it really sings.
The foolish observer may ask, "But Radek, why model so much detail in a fly that will not only be briefly visible in the film, but will most likely be either a) out of focus, or b) blurred beyond recognition due to the erratic flying?"
To that I answer: Yep. There's no GREAT reason for making the fly as detailed as I did; I could probably have gotten away with much less. Here are the reasons in defense of my tainted judgment:
1.) I love doing it! It's fun, and I I find that once it starts looking good I can't stop work on it. I just have to keep laying in the fine brush strokes. I can't turn it off even if I tried. Walking down the street from the gym I couldn't help but think about how I should add small hairline fractures and imperfections on the wings, how the head needs some nasty fly hair just like the thorax and abdomen, how the crystalline chitin of the wings seemed to scatter light in a pattern that created small blooms of orange and yellow coloration when the light hit it at just the right angle, and how I could create this effect with a custom shader... (all of which I immediately implemented upon returning home). I should note that these details are the result of a lot of due diligence and collecting of both internet and self-filmed (yes, I went out with my camera and filmed real flies... I'm not a loser, really, I totally have a girlfriend...) reference material... it is impossible to call into mind such subtle nuances. Besides, maybe subconsciously, these details DO register when a person watches a CG object onscreen, making it more realistic. Who knows.
2.) It'll look better on my modeling reel.
3.) I could probably stick it on TurboSquid and sell it to make a few bucks more than if it was a low resolution fly.
Okay, enough foreplay. Here're the shots. Email me or post comments if you need to vent. Profanity is welcome and encouraged.


Saturday, May 05, 2007
Fly Swarm
Ok, so now I'm working on creating a swarm of flies for the practicum film. I've been reading up on the Crowd simulation in the book 3ds max Animation with Biped by Michele Bousquet. I opted for the crowd simulation approach because I figured I'd need a bit more control over the delegates (the members of the crowd) than a particle system would probably allow me... although Particle Flow probably would have also been a viable solution. This route, however, forced me to start learning crowd simulation, which I'm sure will be immensely useful.
I've also researched videos of flies on YouTube. Turns out, there is not that much user posted video of flies. I guess most people are not that interested in filming flies. I was mostly interested in the movement of the insect once it settles on a surface.
I wanted to break it down into several movements that I could assign the delegates. For example, flies tend to sit in place, rub their front legs together, or rapidly dart across a surface for several inches.
Here are the clips I found (the clip with the trained flies is insane):
I've also researched videos of flies on YouTube. Turns out, there is not that much user posted video of flies. I guess most people are not that interested in filming flies. I was mostly interested in the movement of the insect once it settles on a surface.
I wanted to break it down into several movements that I could assign the delegates. For example, flies tend to sit in place, rub their front legs together, or rapidly dart across a surface for several inches.
Here are the clips I found (the clip with the trained flies is insane):
Tuesday, April 24, 2007
No One Update
Good news: the film kicks. Hardcore. Eerie, creepy, and unsettling, all within 7 or so minutes.
Bad news: more and more CG is being cut from it. While I 100% agree with the decision, it seems that the CG head is no longer necessary for the movie. Therefore, I plan to finish the head and do some sort of project with it for my own experience.
The CG fly shot remains. I need to add flies buzzing around a bloody foot locker. Modeling flies now, will add progress of that shortly. For now, please amuse yourself with our FX test for the CG head. The first clip shows the background plate and CG element without any compositing. The second clip shows the finished test, comped by Joe Grochocki (jgrochocki57@aol.com). Enjoy.
Bad news: more and more CG is being cut from it. While I 100% agree with the decision, it seems that the CG head is no longer necessary for the movie. Therefore, I plan to finish the head and do some sort of project with it for my own experience.
The CG fly shot remains. I need to add flies buzzing around a bloody foot locker. Modeling flies now, will add progress of that shortly. For now, please amuse yourself with our FX test for the CG head. The first clip shows the background plate and CG element without any compositing. The second clip shows the finished test, comped by Joe Grochocki (jgrochocki57@aol.com). Enjoy.
Tuesday, March 06, 2007
HDR
So I've been playin' with HDR rendering for the past few days. Scouring internet for tutorials, piecing together information from my 3D lighting book... etc. I want to be able to replicate lighting conditions on set. It's been tough, but I think I'm making progress. Since using HDR isn't just an option in the program, it's actually a new way of using the tools that were already there, I've been forced to delve into the world of Final Gather and global illumination. It's been very good to me so far. 2 problems:
--When I use the GI lighting, I can't see my specular highlights, and it makes the character look too "soft" or mushy.
--When the head is translated (for example, rotated) the shadows seem to jump around as if they were actually a super low rez shadow map.
Nevertheless, I'm confident these will be overcome and that this will end up looking really badass.
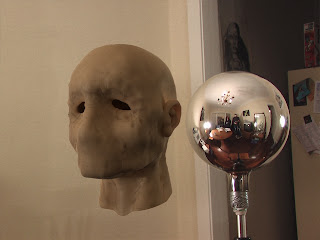

--When I use the GI lighting, I can't see my specular highlights, and it makes the character look too "soft" or mushy.
--When the head is translated (for example, rotated) the shadows seem to jump around as if they were actually a super low rez shadow map.
Nevertheless, I'm confident these will be overcome and that this will end up looking really badass.


Tuesday, February 27, 2007
No One head
So I've experienced what many artists in the industry experience... dramatic changes in production after a large time investment has already been made.
Columbia College does not believe in using a 3D solution for the effect, so it has been toned down.
Severely.
No need for 3D at all, in fact. What the actual effect will really look like is to be determined in the near future. Now, what to do with the work that I already did. After all, I researched HDR image lighting, took my first steps into the wonderful world of Mudbox, and have created a head for which I outlined a whole pipeline, from concept art through modeling, texturing, rigging, camera tracking, compositing...
I briefly considered dropping the project and starting something new. But I'm going to take this poor fellow under my wing now, and nurse him to completion.
The first image below is the result of an evening's worth of Mudbox modeling, output as a displacement map, rendered in Max with mental ray. The following two are the same model with a Subsurface Scattering shader applied and no textures.
Isn't he adorable? How could I let him languish somewhere on my hard drive?
By the way: here is an excellent SSS tutorial:
http://usa.autodesk.com/adsk/servlet/item?siteID=123112&id=7445229&linkID=5573440


Columbia College does not believe in using a 3D solution for the effect, so it has been toned down.
Severely.
No need for 3D at all, in fact. What the actual effect will really look like is to be determined in the near future. Now, what to do with the work that I already did. After all, I researched HDR image lighting, took my first steps into the wonderful world of Mudbox, and have created a head for which I outlined a whole pipeline, from concept art through modeling, texturing, rigging, camera tracking, compositing...
I briefly considered dropping the project and starting something new. But I'm going to take this poor fellow under my wing now, and nurse him to completion.
The first image below is the result of an evening's worth of Mudbox modeling, output as a displacement map, rendered in Max with mental ray. The following two are the same model with a Subsurface Scattering shader applied and no textures.
Isn't he adorable? How could I let him languish somewhere on my hard drive?
By the way: here is an excellent SSS tutorial:
http://usa.autodesk.com/adsk/servlet/item?siteID=123112&id=7445229&linkID=5573440


Monday, February 26, 2007
Woman on Street Hallucination VFX test
Test of a hallucination the protagonist experiences while walking down the street. This effect may end up being accomplished via simple editing, but I decided to give it a shot and see what production thinks about it.
To create the head "jitter" I took something like two dozen still frames of the talent with various head positions, then chose 5 or 6 of the best ones, which were then tweaked in Photoshop and then imported into Combustion for compositing.
To create the head "jitter" I took something like two dozen still frames of the talent with various head positions, then chose 5 or 6 of the best ones, which were then tweaked in Photoshop and then imported into Combustion for compositing.
Flies
In the script, a swarm of flies hovers around a dead dog. I wanted to test out an effect that would eliminate the need to have a million flies on set.
The video presents VFX flies added to a still image. Created with PFlow particle system in 3ds max using a simple still image with an alpha channel of a fly. If production decides to go down this road, I can put more time into it and create an even more convincing swarm, perhaps using Character Studio's crowd system.
The video presents VFX flies added to a still image. Created with PFlow particle system in 3ds max using a simple still image with an alpha channel of a fly. If production decides to go down this road, I can put more time into it and create an even more convincing swarm, perhaps using Character Studio's crowd system.
Video Background Plate
Simple VFX proof of concept background plate shot on mini DV. Shows the camera movement and talent positioning in the final shot.
Subscribe to:
Posts (Atom)